
#
Spring Cloud Bus

This tutorial explains how to build a Spring Cloud Bus. This tutorial contains an example as well.
#
Spring Cloud Bus - Explanation
The main idea behind the Spring Cloud Bus is that when we are using Spring Config Server - Spring Config Clients,
when a change is done in the configuration files, the change is not seen automatically by the Config Clients.
We can always install
Spring Actuator on the client side
and run http://<hostname>:<application-port>/actuator/refresh for refreshing the configuration of the service. This approach
could work when we have a tiny number of services, but it is not working when we have a huge amount of services to manage. We
need to find a solution to update these configurations automatically. This is the role of the Spring Cloud Bus.
The Spring Cloud Bus architecture works with a messaging system (Apache Kafka, RabbitMQ, etc). When the
http://<hostname>:<application-port>/actuator/busrefresh POST command will run on any service, the config changes are send to
the messaging system. The Config Clients are listening to the messaging system and when a change occurs, they will receive
that change. In this case, one command (POST request) is enough for refreshing all the configurations for all the services.
Info
If our architecture is using GitHub (Bitbucket, etc), we can define a webhook in GitHub and when a modification is committed in the master branch, the modification to be propagated in all the Config Clients.
Now let's implement the Spring Cloud Bus.
Starting from our 2 articles Configuration Server and Configuration Client we will need to do the following in addition:
#
Install a messaging system (RabbitMQ in my case)
Installing a RabbitMQ server is quite easy. In my case, I have Docker Desktop installed on my laptop.
The following 2 commands will make you have RabbitMQ running on your machine:
docker pull rabbitmq:3-management
docker run -d --hostname my-rabbit --name some-rabbit -p 15672:15672 -p 5672:5672 rabbitmq:3-management
We will configure RabbitMQ to use the default ports.
If you want to access the console, you can use the following link : http://localhost:15672/#/.
The default username is "guest" and the default password is "guest". RabbitMQ will also listen on port 5672.
#
Configure the Config Clients
On the Config Clients we need to add the following dependencies:
<!-- https://mvnrepository.com/artifact/org.springframework.boot/spring-boot-starter-actuator -->
<dependency>
    <groupId>org.springframework.boot</groupId>
    <artifactId>spring-boot-starter-actuator</artifactId>
    <version>3.1.1</version>
</dependency>

<!-- https://mvnrepository.com/artifact/org.springframework.cloud/spring-cloud-starter-bus-amqp -->
<dependency>
    <groupId>org.springframework.cloud</groupId>
    <artifactId>spring-cloud-starter-bus-amqp</artifactId>
    <version>4.0.1</version>
</dependency>

<!-- https://mvnrepository.com/artifact/org.springframework.cloud/spring-cloud-bus -->
<dependency>
    <groupId>org.springframework.cloud</groupId>
    <artifactId>spring-cloud-bus</artifactId>
    <version>4.0.1</version>
</dependency>
In application.properties I have the following content:
server.port=8001
spring.application.name=client1-service
spring.config.import=optional:configserver:http://localhost:9900

# Actuator will show all the information which is not done by default
management.endpoint.health.show-details="ALWAYS"
management.security.enabled=false
management.endpoints.web.exposure.include=*

#For connecting to RabbitMQ
spring.rabbitmq.host=localhost
spring.rabbitmq.port=5672
spring.rabbitmq.username=guest
spring.rabbitmq.password=guest

cloud.bus.enabled=true
cloud.bus.refresh.enabled=true
The Client controller looks like :
package com.example.configclient;

import org.springframework.beans.factory.annotation.Value;
import org.springframework.cloud.context.config.annotation.RefreshScope;
import org.springframework.web.bind.annotation.GetMapping;
import org.springframework.web.bind.annotation.RestController;

@RestController
@RefreshScope
public class MyController {

    @Value("${color.window}")
    String colorWindow;

    @Value("${color.car}")
    private String colorCar;

    @GetMapping("/readValues")
    public String status() {
        return  " <p> From the Config Server I have read: </p>" +
                " <p> color.window ="+ colorWindow + " </p>" +
                " <p> color.car ="+ colorCar + " </p>";
    }
}
Don't forget to add @RefreshScope !
#
Configure the Config Server
On the Config Server we need to add the following dependencies:
<!-- https://mvnrepository.com/artifact/org.springframework.boot/spring-boot-starter-actuator -->
<dependency>
    <groupId>org.springframework.boot</groupId>
    <artifactId>spring-boot-starter-actuator</artifactId>
    <version>3.1.1</version>
</dependency>

<!-- https://mvnrepository.com/artifact/org.springframework.cloud/spring-cloud-config-monitor -->
<dependency>
    <groupId>org.springframework.cloud</groupId>
    <artifactId>spring-cloud-config-monitor</artifactId>
    <version>4.0.3</version>
</dependency>

<!-- https://mvnrepository.com/artifact/org.springframework.cloud/spring-cloud-starter-stream-rabbit -->
<dependency>
    <groupId>org.springframework.cloud</groupId>
    <artifactId>spring-cloud-starter-stream-rabbit</artifactId>
    <version>4.0.3</version>
</dependency>
In application.properties I have the following content:
server.port=9900
spring.application.name=spring-cloud-config-server
spring.cloud.config.server.git.uri =git@github.com:catatomoiu/config.git
spring.cloud.config.server.git.clone-on-start=true

# Actuator will show all the information which is not done by default
management.endpoint.health.show-details="ALWAYS"
management.security.enabled=false
management.endpoints.web.exposure.include=*

spring.cloud.inetutils.preferred-networks= 192.168.0

#RabbitMQ details
spring.rabbitmq.host=localhost
spring.rabbitmq.port=5672
spring.rabbitmq.username=guest
spring.rabbitmq.password=guest
spring.cloud.inetutils.preferred-networks must be set when you have many network interfaces defined on your machine and InetUtils doesn't get the right hostname/localhost.
That's all. Not too much complicated.
#
Test the Cloud Bus
Now, let's test the Spring Cloud Bus.
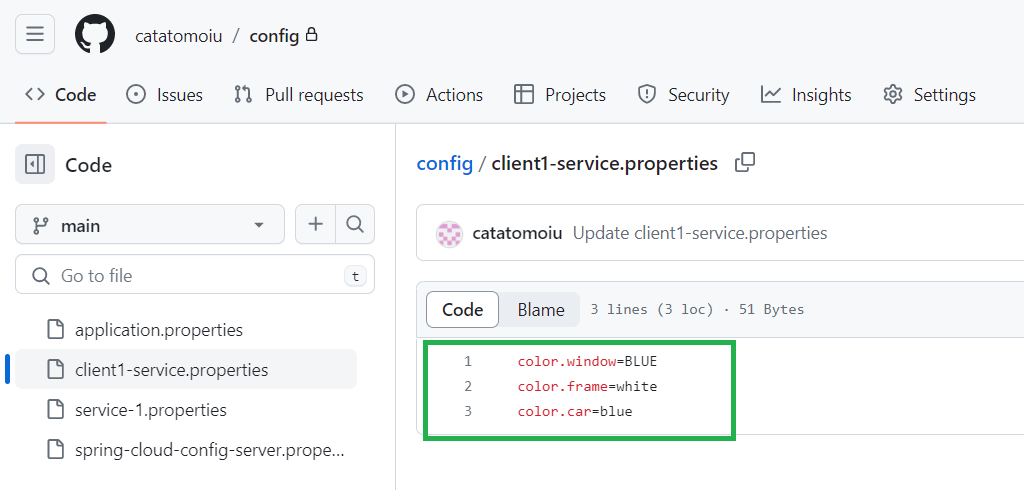
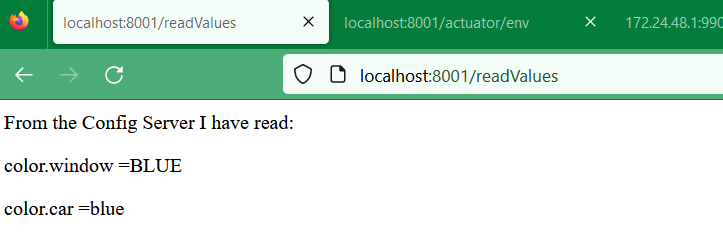
Without any modification, the Client will see the actual values from the configuration files.
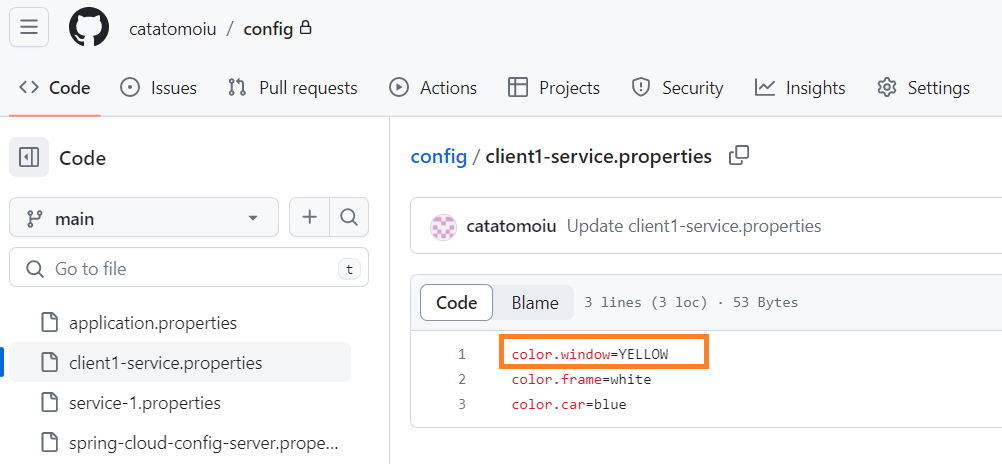
We modify a config file:
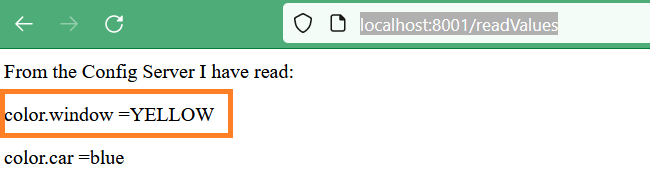
We run http://localhost:8001/readValues in the browser again, but we will not see any changes.
Run curl -X POST http://localhost:9900/actuator/busrefresh (but this could be run on the client port as well)
and when we run http://localhost:8001/readValues in the browser, we will see:
All works like a charm ! Enjoy !